Wednesday, December 23, 2015

Spent grain bread, sourdough onion rolls, cornbread, bread to go, and starting a starter

This past week, I made spent grain bread successfully, a relief after last time's weirdly low loaf. I also cooked a couple of great cornbreads, made sourdough onion buns again, brought bread on a family trip, and started making a starter.

Starter

Why do I need a third starter? I don't, so I converted my white starter (50-50, by volume). But why convert it? I'm beta testing an app, Bread Boss, which guides you through a variety of sourdough bread recipes. Now's the perfect time to test, since I'm staycationing the two final weeks of the year.

Spent grain bread

I used the same ingredients for my spent grain bread as last time (and almost the same as the time before). The only differences were in the prep:
  • I put in the salt, olive oil, and honey first, with the water and spent grain.
  • The spent grain was frozen, so I nuked it with the water until it was warm (but not as hot as last time).
  • I took out the bread as soon as it was done.
  • I didn't use the delay timer.
This loaf wasn't as tall as the first one, but it had great taste and texture. It was a bit lopsided, which is common when baking in the bread machine, but hadn't happened the two times before.

The outside

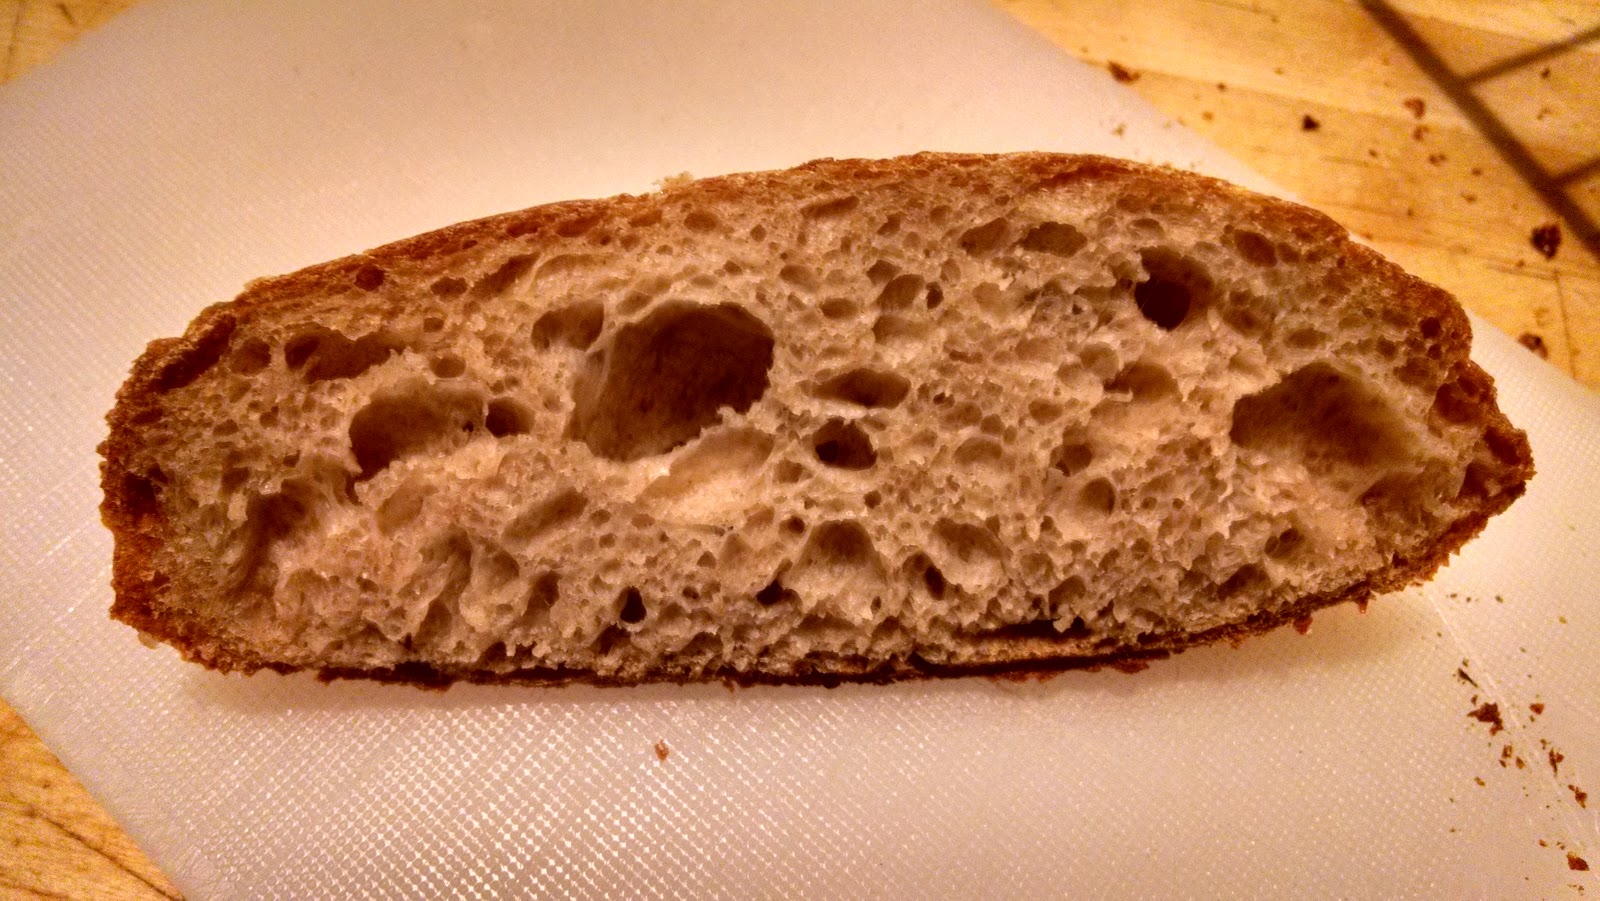
This recipe, especially with the spent grain from North English brown ale, is a winner.

The inside

Cornbreads


I used The America's Test Kitchen Family Cookbook recipe for Southern Skillet Bread (p. 496), and the results were so good I made the cornbread again just a few days later. Here's what was different from the recipe:
  • Instead of 3/4 cup buttermilk, use 3T buttermilk powder and 3/4 cup water.
  • Instead of bacon drippings, use 2t roasted peanut oil and 2t vegetable oil (safflower, I think).
  • The usual sodium reduction measures:
    • No salt
    • Sodium free baking powder and baking soda
I'd used all peanut oil before, which I rather liked, but it seemed to taste too peanutty for our guests. Half the amount seemed perfect.

I used Quaker Oats yellow cornmeal, which worked just fine. Before I'd used Bob's Red Mill medium grind cornmeal, which I liked, but sometimes it had hard bits of grain that would hurt my teeth. If I happen to find Bob's fine grind, I'll try that.

This bread tasted fine the next day, but it had lost its wonderful crunch. Also, it's best warm.

Sourdough onion rolls

I've made these before, with success, but it's been a long time since I made any sourdough bread, so it felt new.

We had only one, smallish onion, so I chopped it, cooked it, and put all of it (2/3-3/4 cup) into the dough. I added it during the final stretch-and-fold, which turned into a dough mangling session.

I wanted to bake the rolls the next day, so I immediately put the dough in the refrigerator.

Dough, the next morning
The next day I took it out, let it warm up (partly in the oven on proof mode), and divided it into 8 parts. I shaped 6 buns and left the other 2 until later.

6 buns ready to rise

I cooked a little more onion and put it on top of a couple of buns, but I think the bread without the onion topping was just as good.

The buns at the bottom left have additional onion on top.
These buns probably would higher if my niece didn't pat them.

I cooked the buns at 450 degrees for 20 minutes with a cover over the pan, and then about 15 more minutes uncovered.

After cooking

These buns are amazing within the first hour or two out of the oven, when the onions are warm and the crust is still crunchy. After a few hours, they're probably best toasted, to bring out the onion flavor and make the crust crisper.

The next day I took the remaining two roll portions and shaped them into balls. After letting them rise a bit, I cooked them at 475, covered, for 15 minutes, and then uncovered for about 15 more minutes.

Mini boule

Bread to go

So I'd have food to eat with 10 of my closest family members, I baked a couple of loaves of bread: Bohemian black bread (BBB) and spent grain bread.

The BBB was much better looking than last time, thanks to using black cocoa.

Dark and out of focus, just the way I like it

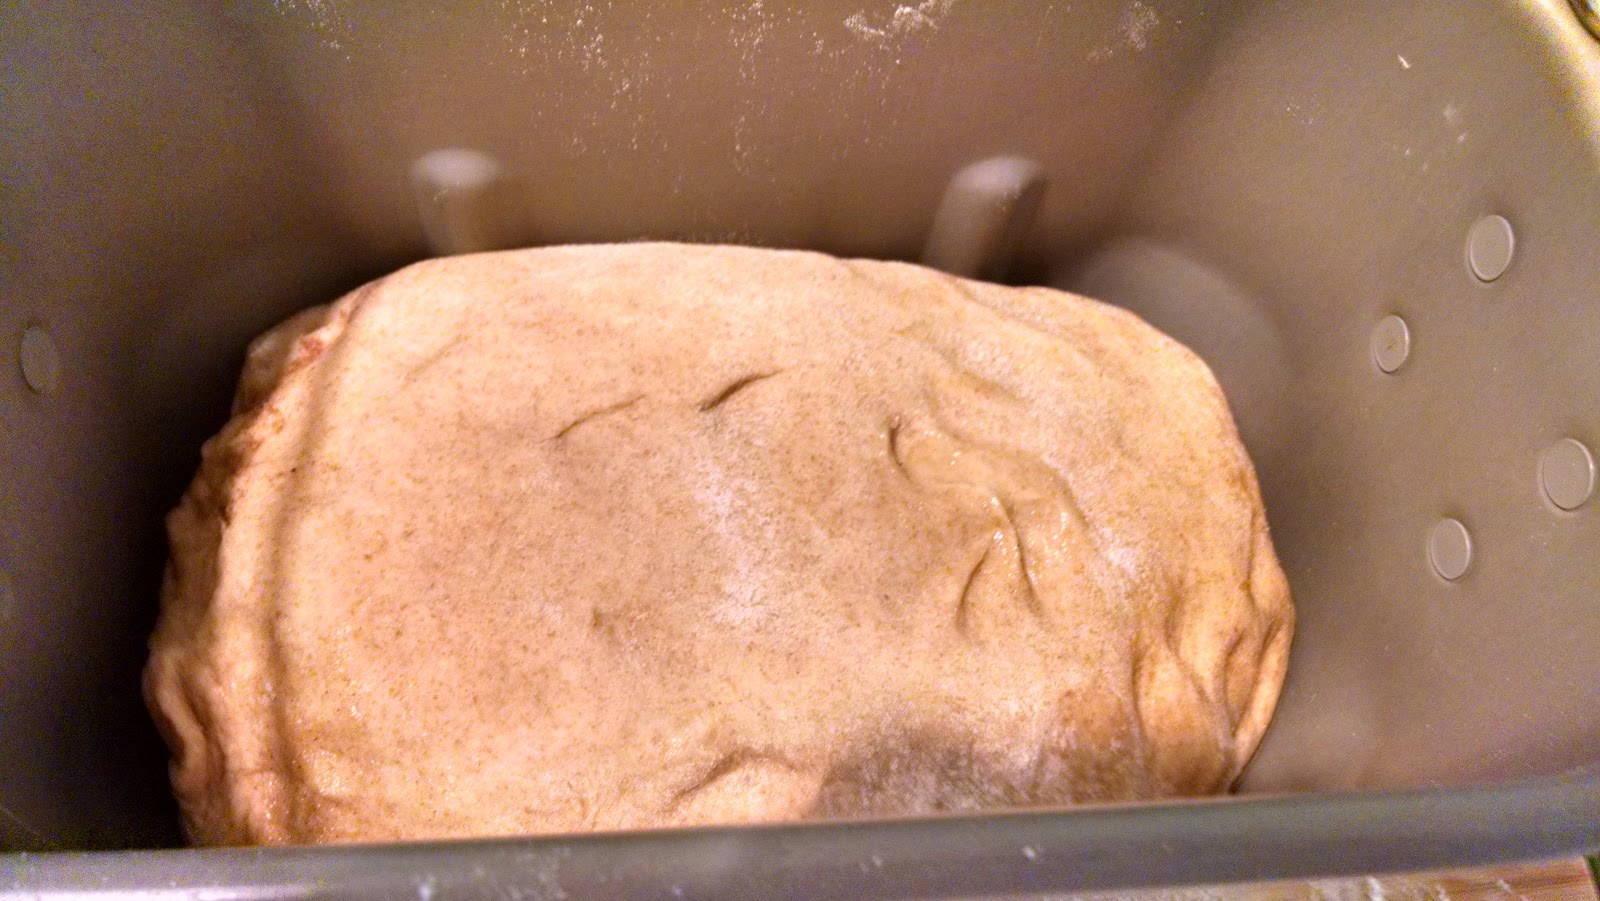
The spent grain bread was the same recipe I made the last couple of times. I checked the dough a few minutes into its first rise and noticed that it was very soft and was almost non-existent on the left side of the bread pan. I picked the dough up, as best as I could, and put it back down in a more symmetric shape.

It worked! The loaf was high and symmetric.

Spent grain bread

For future reference, here's the ingredient list, in pan-addition order:
  • Scant 1 cup water, mixed (and, if the grain is cold or tough, microwaved 2 minutes) with 3/4 cup spent grain, firmly packed
  • 2 T olive oil
  • 2 T honey
  • 3/4 t salt
  • 2-1/4 c bread flour
  • 3/4 c whole wheat flour
  • 1 t bread machine yeast
It's best to check the dough's shape when it begins rising, so you can fix the shaping (making it symmetric) if necessary.

Sunday, December 13, 2015

Same ingredients, a fraction of the height

What a difference a day makes.

I made another loaf of the North English brown ale bread, with the same proportions as before, but this time it turned out completely flat. I thought it'd be horrible, but it was actually tasty and chewy—a completely different texture from before.

The loaf on the left (and slice on the right) is the flat version of
the loaf on the right. The darker color is no surprise, since I
cooked the grain in the water, turning the water dark brown.

Here's all I can recall doing differently:
  1. Instead of putting the oil and honey in first, with the water and spent grain, I put them in last.
  2. A few hours before loading the ingredients into the bread machine's pan, I microwaved the water and spent grain together for 2 minutes to cook the grain a little more.
  3. I used olive oil instead of canola oil.
  4. I took the bread out 35 minutes after it was done instead of right after.
That's all I can remember. I suspect #1 is the cause—perhaps because the delay in mixing in the honey somehow made the yeast too active or not active enough. Another possibility is that the heavier oil and honey weighed down the flour and let moisture or salt get to the yeast sooner than it should have, or maybe later and the bread over proofed and sank. A thin skin of dough along the side of the bread pan might support the overproof theory.

Here's why I put the oil and honey in later than before:
  • That's the order the Zojirushi instructions recommend.
  • It's easier to pour in the honey after the oil, since I measure them in the same container.
  • I thought olive oil might be more susceptible to off flavors (from being mixed with water for a few hours) than canola oil.
I'm going to make another loaf soon from frozen spent grain, doing everything more or less the same except no delay timer, and the oil and honey and salt will go in before the flour. Why add the salt then? I want it to be more evenly distributed, and I suspect that when it's left until last, it's not. Also, I want to reduce the odds that the salt will touch the yeast before the bread is kneaded.

Wednesday, December 9, 2015

North English brown ale bread

My husband was itching to brew a new batch of beer, using a kit we'd recently bought from Beer and Wine Makers of America, down in San Jose. It didn't hurt that his Christmas gift had arrived and was obviously the brewing hardware he'd asked for. Yes, Nathan gets to open Christmas presents early. Way early.

The kit was for North English Brown Ale, and the spent grain smelled delicious—dark without the bitter overtones of his last beer, Celebration Ale. He mentioned that the brewing process was different from the one he was used to, and that not all of the grain got soaked. More on that later.

I was eager to make bread with the spent grain, but I decided to make a smaller loaf. I basically multiplied all the ingredients of the recipe I like (Snappy Service Cafe's Homebrewed to Home Baked: Spent Grain Bread) by 3/4 to 2/3, using Hensperger's similar recipe (whole grain daily bread, p. 181) as a guide. The ingredient list ended up being:
  • Scant 1 cup water
  • 3/4 cup spent grain, firmly packed
  • 2 T canola oil
  • 2 T honey
  • 2-1/4 c bread flour
  • 3/4 c whole wheat flour
  • 3/4 t salt
  • 1 t bread machine yeast
The Hensperger recipe, besides using buttermilk instead of water and having slightly different proportions, also calls for a bit of rolled oats and gluten. But I stayed with the Snappy recipe's ingredient list.

I used a new honey this time, from Bay Area Bee Company.

Mmmm... This is a great smelling honey.

Another change I made was using the delay timer (on basic cycle, regular crust). I set it to finish at 6:30 a.m., before my alarm goes off but after I sometimes wake up anyway. If I got it out right away, it'd have time to cool before I had to leave to catch the bus.

The next morning I woke up (a little early) to the delicious scent of baked brown bread. I took the loaf out of the bread machine and set it out to cool. It was tall and light for its size, with a nice, medium brown color—darker than the hefeweizen bread, but lighter than the celebration bread.

English brown ale bread, fresh out of the bread machine

An hour later I had to leave, and since the bread was almost cool, I felt free to cut a slice off. This is some tasty bread! Its only fault, as far as I'm concerned, is that some of the grain was a little hard on the teeth. This might be due to my husband's problem in getting all the grain wet and cooked.

First slice

I'll make this recipe again in these proportions. I have plenty of leftover grain from this batch of beer, and I might try cooking it a bit in the bread water (perhaps in the microwave) before putting it in the bread machine.

Monday, December 7, 2015

Two semolina breads

We needed some white bread to use for Thanksgiving stuffing, so I made a Hensperger recipe that features a bit of semolina: pane italiano (p. 208).

Tragically, the stuffing recipe used the whole loaf. Still craving semolina bread, I made a similar (but not as tasty) recipe a couple of days later: semolina country bread (p. 202). I soon tried the first loaf again, but it turned out to be quite different from the first time.

Pane italiano numero uno

I made the 1.5 pound loaf with no ingredient changes except for the usual halving of yeast and salt. I baked it on the normal cycle, not noticing that the recipe called for extra kneading, accomplished using either the French bread cycle or by resetting the machine to double the kneading time. The recipe calls for a dark crust, but I specified a normal crust, figuring that stuffing bread needn't be overbaked.

I should've made the 2 pound loaf so we could've had some left over! The little bits that stuck to the paddles were delicious and crunchy—semolina's a great ingredient. The crust had some big bubbles for some reason. I couldn't resist poking one, and it shattered.

No picture, unfortunately. But the stuffing was really good.

Pane italiano numero due

When I made the bread again, I still used the 1.5# recipe, but I measured by weight instead of by volume. That was probably a mistake, as the recipe specifies only volume, and I think that the flour bag's weight/volume ratio was too high, resulting in more flour than when I measured by volume.

Otherwise, I followed the recipe instructions more precisely than before. I specified a dark crust and reset the machine after kneading was finished, so it could knead again. I checked the consistency when I reset the machine; it seemed dry, so I added some water. Then, unfortunately, I had to go to bed, so I didn't get to see the bread until the next morning. 

The loaf was much taller than before—too tall to fit into the breadbox unless I took out the cutting board. It wasn't noticeably darker than before, and it wasn't crisp at all by the time I saw it.

A very tall loaf

We liked it OK, but it's just kind of a semi-interesting white bread at this point. I have a feeling that this bread is much better if you eat it while it's warm.

If time allows, I prefer the Italian semolina bread recipe (p. 252). I might make pane italiano again, but only for stuffing bread or if I plan to eat it right after it finishes. And I'll measure by volume.

One good thing about pane italiano is that you can make it using a delay timer. I'd have to create a homemade course to be able to do the extra kneading without intervention. (My machine doesn't have a French bread setting, which would make the extra kneading happen automatically.)

Semolina country bread (pane di semola)

This bread has a higher proportion of semolina than the first, with no sugar or potato flakes. It also has sesame seeds, which make it a little more interesting. But not much more.

Cooked on dark, this bread doesn't look very dark
(the side wasn't as dark as this picture makes it seem)

This bread was fine, but I probably won't make it again.


Friday, November 20, 2015

Celebration ale spent grain bread

Last weekend my husband brewed Oak Barrel Winecraft's seasonal Celebration Ale, which features 1 part barley to 2 parts crystal malt 40L. It also includes sugars and spices, but I'm not sure how much of those made their way into the grains.

So what the heck is crystal malt 40L? According to Brew365, it's a type of crystal/caramel malt produced from wheat rather than barley. "The process darkens the wheat malt (from 3L to 38-53L) and produces nonfermentable sugars. The roasting process produces a caramel, roast, moderately sweet flavor in addition to keeping the mouthfeel properties of the base wheat malt." It's used in dark beers. Judging from the range of 38-53L, it sounds like crystal malt 40L is one of the lighter dark wheat malts.

Barley and crystal malt 40L, after brewing

After brewing, the spent grain smelled much less sweet than the Hefeweizen leftovers. This spent grain did, however, make for some tasty, dark bread. I'll call it Celebration bread.

Dense crumb around the edges

I used the same recipe as before: Snappy Service Cafe's Homebrewed to Home Baked: Spent Grain Bread. The only difference from before was the different spent grain and the fact that I accidentally left the bread in the breadmaker for a few hours after baking. The extended time in the Zo didn't seem to harm the Celebration bread, but it might have contributed to the dense crumb along all the outside edges of the bread.

Although I made the same adjustments as before (search for "details" in my previous post), the Celebration bread had a very different texture, color, and flavor from the Hefeweizen bread. The texture wasn't as light, perhaps because of being trapped in the breadmaker. During the mixing cycle, I checked on the consistency, and it was more solid (in a good way) than the wetter Hefeweizen dough. The color of the Celebration bread was darker, more like a pumpernickel. Interestingly, the flavor was also more like pumpernickel—bittersweet, with molasses overtones. Each time I had the Celebration bread, the first bite seemed a little too bitter, but by the last bite I loved it.

I ate the Celebration bread both alone and with tuna fish. Delicious!

Next time I might try a different oil. I'll probably also reduce the recipe to produce something closer to a 1.5# loaf. This bread was ridiculously tall. Never before have I made a machine-baked loaf that barely fit into the breadbox.

Squeezed into the breadbox


Wednesday, November 11, 2015

Hefeweizen & penuche breads, plus terminology

As I mentioned in my last post, I had some wonderful smelling grain left over from my husband's wheat beer brewing; I put it into some bread. Then last week I made some cinnamon bread that I've made before, which has what Hensperger calls a penuche filling. I also made toasted sesame whole-wheat bread (great with tuna sandwiches!) but that's an old standby; nothing new to say there.

Before I get into the bread, let me geek out about words.

Today's words: Hefeweizen & penuche

At least one northern German I've met has expressed bemusement at the term Hefeweizen, saying the Hefe was unnecessary: it's just wheat beer (Weizen or Weizenbier), as opposed to yeast-wheat beer. (I'm always tempted to think of Hefe as meaning "boss", like the Spanish jefe, but it really means yeast.) Wheat beer names differ by language, brewing region, and recipe variation. Many of the German names have Weiss instead of Weizen in them. Weiss means white and, interestingly, in both English and German weiss/white has the same etymological root as Weizen/wheat.

On to penuche. I first came across the word in Hensperger's cinnamon bread recipe (p. 281). She describes penuche as "a melted filling of sugar, butter, vanilla, and nuts," and says that the word means "brown sugar" or "raw sugar" in Spanish. The word had looked vaguely French to me, so I'd wanted to pronounce it peh-NOOSH (OO as in noon, not book). But Spanish? That seems like peh-NOOCH-ay. But this is 'merica, so apparently it's pronounced puh-NOOCH-ee.

Wikipedia says the Spanish word is actually panocha, but that word (as I found out from some unexpected Google search results) usually means something cruder in Mexican Spanish. The Mexican brown sugar is more commonly called panela.

It's a little weird that Hensperger uses the word penuche for her cinnamon filling, since the filling isn't at all fudgy. Also, the penuche recipes I found have no cinnamon, at all. They feature brown sugar, butter, and milk of some sort; other common ingredients are vanilla, nuts, and additional sugar such as corn syrup. But I suppose everything in the filling except the cinnamon is penuche-esque. And the filling is delicious. I can't imagine eating it straight, though. Too sweet!

Spent grain bread

I chose one of the recipes from my last postSnappy Service Cafe's Homebrewed to Home Baked: Spent Grain Bread.

Spent grains

I didn't have much time, so I heated the water and spent grain for 30 seconds in the microwave, and turned off the Zo's initial rest cycle. During the first knead I checked on the dough; it seemed a bit wet but fairly cohesive, so I didn't add any flour.

The baking bread smelled great, and the final product looked much better than most of my recent bread machine loaves.

A tall, good-looking loaf of bread

I sliced into the bread after it was fully cooled. The end was easy to slice, but the next slice was very uneven; the bread was so soft it was hard to cut. Adding some gluten might help with that.

Good looking inside, too

The taste was great, with a texture that (during the first 24 hours) was on the verge of being too soft. The whole grains kept the texture interesting, though a bit of husk did lodge annoyingly between my teeth.

One bite of the bread had some grit in it. I guess they don't have to be as careful with beer grains (which get filtered) as with grains for consumption. I wonder if the grit would be easy to wash out before brewing. Or maybe this was an anomaly; the rest of the bread was grit free.

The texture of the bread improved (to my taste) after the first day, as the bread dried. The recipe warned that the bread would be too dry after a couple of days, but I didn't notice that problem.

Details:
  • salt -> 1 tsp, yeast -> 1.25 tsp (bread machine yeast)
  • agave syrup -> honey (TJ's multi-floral & clover)
  • bread flour, canola oil
  • 1.25 cups water

Cinnamon bread

I made the same whole-wheat sourdough with "penuche" filling that I'd made before. It turned out less messy this time, though I still think the dough could be wetter and hold together better.

This bread has some holes (see the top and right)

I used the dough setting of the bread machine, using more milk than the recipe called for, and adding yet more milk during kneading. The dough was easier to spread this time, and I got more swirls than before. After I shaped the dough, I put it back in the machine (with mixing blades removed) and used the Homemade 2 cycle, which started (perfectly) at Rise 3.

A bit messy outside

Here's what I did ingredient-wise that was different from usual:
  • 2/3 c whole-wheat starter, 1/3 c white
  • Started with about 1/2 c 1% milk, adding 2 T. I probably could've just used 3/4 cup.
  • For fat, I used 1/2 ghee, and 1/2 extra virgin olive oil.
  • I used more than 1/2 cup walnuts (toasted and chopped fine).

Monday, November 2, 2015

Spelt bread and spent grain bread

Last weekend I made spelt bread, to meh results. I'm considering making spent grain bread, but haven't found the time/recipe/nerve yet.

The spelt bread was from Hensperger (p. 128) in the 1.5# size (as usual) with the following modifications:
  • buttermilk powder + water instead of buttermilk (didn't have buttermilk)
  • ghee instead of whipped reduced-fat margarine (didn't have margarine)
  • 1T gluten instead of 1T + 1t (oops)
  • half the yeast, half the salt (as usual)

The recipe says to set the crust on dark, but the Zo doesn't let me do that for the whole-wheat cycle. I could create a custom cycle, but I probably won't.

The resulting bread was tasty but dry, so it was best as toast. I'm sure it would've been moister if I'd taken it out as soon as it was baked, and not cut into it while it was warm. But still. The first slice of this bread was crisp like a cracker!

The inside was dry.

It was also misshapen.

The outside was lumpy.

And it had weird formations on the surface.

The outside was even worse in closeup

Still, I might make this bread again. I'll be sure not to leave it in the machine after it's baked, I might add some more liquid (maybe using real buttermilk), and I'll probably try a different fat.

One Degree organic sprouted spelt flour (now in the freezer)

My husband brewed some hefeweizen beer last weekend, and the spent grain smells wonderful. I've got to use it in some bread, perhaps with barley malt syrup as a sweetener.

The following recipes sound interesting to me. Most of them have at least 1 cup of spent grain, and I avoided breads with egg because they just sounded wrong.

Also, I need to check out Spent Grain Chef, a bunch of recipes from Brooklyn Brew Shop that feature spent grain (in granola! brownies! burger buns! corn sticks! and more!). I happen to have a mini corn pan, so I might need to make those corn sticks.

Tuesday, October 27, 2015

Dutch oven walnut (no-knead) sourdough, poppy-sesame seed sourdough, and a failed cornbread

In which I bake good and meh sourdoughs from the same batch, cook a practically inedible cornbread, and consider no-knead bread...

Sourdough breads


Dutch oven loaf vs. baking stone loaf

I've often been disappointed in the height of my sourdough loaves, but I'm very happy with the walnut sourdough loaf I just baked in a Dutch oven. However, the Dutch oven wasn't the only difference between this and my usual sourdough:
  • I never kneaded the dough, at all. Not even a stretch.
  • After mixing the dough (sans walnuts), I put it in the refrigerator for 3.5 days. (I don't remember if I refrigerated it right away or waited a bit. I might have punched down the dough after a day or two.)
  • I preheated the oven with a stone on a low shelf and the Dutch oven (but not its lid) on the middle shelf. (I put the lid on when the bread went in.)
  • I preheated the oven at 500 degrees, meaning to turn it down to 475 right after adding the dough, but forgetting for a couple of minutes.
  • I put the dough in the Dutch oven seam-side up (using a dishcloth to maneuver the loaf without getting close to the burning hot pot). I also tried to slash the loaf a bit, but that didn't take.

No walnuts in this piece... but it's still good

Also worth noting: the dough was exactly the same as the sesame-poppy seed dough. I'd made a double batch, immediately mixing soaked seeds into the other half. I baked the seeded loaf the day after mixing, using a baking stone and (as soon as I remembered) a big pot as a cover.

I've realized that I don't like poppy-sesame seed sourdough. I'm not sure whether that's because the recipe has way more seeds than the sesame seed bread I've loved in the past, or because I just don't like poppy seeds in sourdough. The bread was fine when toasted, but I won't be making it again.

Lots and lots of seeds in and on this loaf

Cornbread

I'd made this skillet cornbread successfully before, but this time it was gummy and pale, with weird bubbles. Yuck! I think I did two things wrong:
  1. Preheated the skillet. It was supposed to go in the oven for a couple of minutes, but I left it in much longer. Although preheating is good for flour-water-salt kinds of bread, apparently it isn't for something that's more like a quick bread.
  2. Maybe mixed it too much.
Better luck next time.

Notes on no-knead bread

One of these days I might try this recipe for no-knead dough (parens indicate my calculations for a couple of sizes I might try):

To 100 parts flour (375/150 g), add 1.5 parts salt (~5/2 g) and 1 part (~4/1.5 g) instant yeast. Whisk those together. Add 70 parts (~262/105 g) water, and stir to combine. Cover, then let rise overnight. Transfer to the fridge, let ferment for three days, then turn dough out on to a well-floured surface. Shape dough, sprinkle with flour, and cover with a floured cloth. Let it rise for at least two hours and up to 4 at room temperature. Slash, then bake in a preheated 450°F Dutch Oven for 15 minutes with the lid on. Remove the lid, and continue baking until it hits around 209°F, 30 minutes or so. Let it cool.
From http://www.seriouseats.com/2011/06/the-food-lab-the-science-of-no-knead-dough.html

Wednesday, October 21, 2015

The ex-grow house, themed bread, and rolling in walnuts

Last weekend I baked two walnut sourdough loafs. The only interesting parts:
  • The first loaf was themed.
  • I didn't incorporate the walnuts into the dough of the second loaf, but instead rolled them up into the loaf at shaping time.
The first loaf was for a hey-it's-our-first-night-in-our-new-house-but-this-is-not-a-housewarming party. Some friends of ours just moved into a house that, a couple of years before, had been confiscated by the DEA. Naturally, at this party a grow-house theme kept coming up. Many of us took tours of the ex-grow space, which was now accessible only by walking down a steep hillside and going through small access panels in the side of the house.

I baked a boule and carved a perfectly respectable sunrise into it, knowing from experience that people would take this sunrise as a—gasp!—marijuana leaf.

People avoided cutting the sunrise symbol for as long as possible

Some of the party guests were a little worried about what was in the bread, but my straight-arrow reputation reassured them. Yes, I'm that boringrespectable.

The second loaf was more interesting, technically. I made my regular sourdough, but instead of mixing in the walnuts, I waited until shaping time. I pressed the dough thin, added the walnuts, and rolled it all up into a log that I plopped into a rectangular banneton.

The bubbliest part of the loaf

It worked out well, and I'll do it again.

Half a slice

My shaping can only improve. Here are pictures of the dough before and after the final rise.


Sunday, October 18, 2015

Baguettes, penuche, walnut sourdough, and rice medley

A couple of weeks ago I made baguettes (with lots of help from my husband) and cinnamon bread (using whole-wheat sourdough and penuche). In the past week I also made walnut sourdough and whole-grain daily bread, using TJ's rice medley as the grain.

Cinnamon bread: whole-wheat sourdough with a penuche filling

Baguettes

I made a recipe similar to what I've done before, starting rather late in the day because I was giving the sourdough starter maximum time to make something of itself. 

I used the dough setting of the Zo to make the dough, removing it shortly after the first knead stopped. I then put it into an oiled 2-gallon measuring cup and left it, covered with plastic wrap, in the kitchen for an hour or more. Then into the fridge it went.

The next morning it was huge, sticking to the plastic wrap. I mostly unstuck it, pushed it down, and put it back into the fridge.

I'd sent email to my guys, asking them to shape and bake the baguettes, and providing thorough instructions. Here's a copy of the text. I was a little nervous because they'd never shaped baguettes before, but I shouldn't have worried. My husband did a great job! He made three baguettes:
  1. Just sesame seeds (no wash or water?)
  2. Plain, with picture-perfect slashes
  3. Egg yolk wash, sesame seeds, pumpkin seeds, and sunflower seeds

The resulting breads were all tasty and crusty, if a bit lightweight. Nonetheless, we'd make them all again.

A couple of notes:
  • I should've pushed down the dough before putting it into the fridge.
  • It survived anyway.

Cinnamon bread

This stuff is delicious. I made it twice, trying to iron out the kinks. I'll be making it again, but this time we'll try to save some of it to (1) avoid gaining weight and (2) freeze for toast and perhaps for bread pudding. 

I'd made the whole wheat sourdough recipe that's the basis of this bread before (Hensperger p. 280), and didn't like it much. But when you add penuche—brown sugar, butter, cinnamon, and (for this recipe, at least) nuts & vanilla—it's so good. The penuche instructions are on p. 281.

First I created the dough in the bread machine. Then I took it out, flattened it, and spread butter on it.


Dough with butter on top

The starter, and thus the dough, was too dry for this recipe, so I couldn't spread out the dough very well. As a result, the penuche mixture was perhaps half an inch thick. (I wasn't about to waste any of it!)

Thick penuche layer

I managed to roll it up.

After rolling

I took out the mixing blades from the bread machine's dough pan, and put the dough back in there to cook.

Shaped loaf ready to bake

The finished loaf looked and tasted very good, but it would've been nice to have less bread between the bits of penuche.

The inside of the baked loaf

So I tried again, a day or two later. The second loaf was misshapen, thanks to me adding the liquid too late for it to really get incorporated.

The ugliest part of the second loaf

Still, adding the liquid allowed me to make the dough thinner, enabling a wider dispersion of the penuche.

Inside the second loaf

Notes for next time:
  • I was confused by Hensperger's instruction to check the dough's consistency during the second kneading. I thought it meant during the start of the 2nd rise cycle, but that's not a kneading, just punching down. Next time, I'll check the consistency when the raisin beeper goes off.
  • I watered down the starter of the second loaf, but it was still too thick. Next time, water it down a little more, perhaps using milk instead of water.
  • The first time I used liquid vanilla, which you're supposed to mix with the butter. It never really mixed. The second time I used powdered vanilla, which was much easier to work with.

And the rest

The walnut sourdough was very good, as usual.

The whole-grain daily bread (from a Hensperger recipe I'd made before, p. 181) was good, but a bit too light for our taste. I also didn't like the occasional hard grains that were in TJ's rice medley, although I love them when I'm eating the rice plain. My husband made a grilled tomato-cheese sandwich with this bread, and it was OMG good, in a "you'll have a heart attack by 60" way.

Monday, October 5, 2015

Walnut sourdough, toasted sesame bread, and sourdough waffles

Toasted sesame bread (with white whole wheat)

This week I made three things that I've made before:
  • Walnut sourdough bread (for a potluck)
  • Toasted sesame bread (this time with white whole wheat)
  • Sourdough waffles (this time with a better buttermilk)
Everything turned out fine, and people enjoyed the results. A few notes:
  • Don't overtoast the walnuts. The walnut sourdough bread was very good, but not quite as delicious as it has been in the past, and I suspect that the very toasted walnuts were to blame.
  • My husband baked the sourdough for me. Here are my baking instructions for the long covered baker.
  • The white whole wheat flour (from TJ's) had been in a plastic bag for a while, and it smelled a little stale to me. This wasn't noticeable in the final product.
  • The buttermilk for the waffles was a Canadian brand from the Alameda Marketplace grocery. It cost a lot more than regular buttermilk, but it seemed worth the price.
  • I might want to try half whole-wheat for the waffles next time.
While I was at the Marketplace, I bought some old varieties of wheat flour that I'm eager to try:
  • Sprouted khorasan wheat (One Degree's version of don't-call-it-Kamut)
  • Spelt (also from One Degree; I don't recall if it's sprouted)
The khorasan flour came from Dwayne Woolhouse's farm in Saskatchewan.


Tuesday, September 29, 2015

Walnut sourdough bread & peanut butter ice cream

It was too hot much of last week to bake, but the weather was perfect for a no-cook, same-day ice cream like peanut butter. Toward the end of the week, I also made a walnut sourdough, which is becoming one of my favorite breads.

Walnut sourdough

I've made walnut sourdough before, both with and without the long covered baker. After my weird (though tasty) sourdough last week, I felt like I needed to go back to the original recipe and not mess with the timing so much.

Walnut sourdough, cooked in a long, covered baker

I used the usual Josey Baker recipe, but added walnuts (maybe 1 cup). I deliberately kept the dough a little drier than it has been. I think I've been putting > 1 cup of water in there, but I used a scant cup this time. The toasted walnuts also might have absorbed some water. This dough was much easier to handle than it has been lately.

Walnuts ready for toasting

The conveniently pre-chopped walnut pieces came from Trader Joe's. Previously I'd chopped whole walnuts from Berkeley Bowl, but the TJ pre-chopped nuts are much more convenient, and they tasted just as good to me (after toasting, at least). I just tossed a bunch onto a cookie sheet, put the sheet in the oven, and turned the oven to 350.

I mixed in the walnut pieces (maybe 3/4 cup?) during what would normally be the first mini-knead. The dough was easy to handle, so I sort of picked it up and mashed it around to distribute the nuts.

After the last mini-knead

The rest of the mini-kneads were the usual Josey Baker process of picking up the edge and stretching it gently, turning the bowl a tiny bit, repeat 10 times or so.

A couple of hours after the last mini-knead, the dough had risen quite a bit and was ready to shape.

Ready to shape

I really need to take a shaping class, but here's what I did this time. I put it out onto a well-floured board. After making sure the dough wouldn't stick (using a dough blade to scrape it up, putting flour underneath, and turning it over a couple of times) I patted it into a rectangle. I folded the rectangle into thirds and let it rest. After a few minutes, I folded the dough in half again and rolled it a little bit. I then put it into the gheed baker.

The shaped dough in the long, ghee-brushed baker

2.5 hours later, it looked ready to go into the oven.

After rising

Rats! I forgot to slash it! No matter, it didn't seem to mind.

I didn't notice when the oven reached 450, and the color from the walnuts made it difficult to tell how brown the crust was. About 30 minutes after the bread went into the cold oven, I took off the top of the baker. I took it out of the oven about 10 minutes later.

Partial remains of the loaf

We had to take it to a friend's house (40 minutes away by car) while it was still hot, making the car smell heavenly. We couldn't resist tearing off some to eat. When the loaf was merely warm, we put it into a lunch bag for ease of carrying.

Greasy paper bag, thanks to the walnuts

The bread worked well cut thick and used to hold thin turkey burgers. The next day it was great as a base for tuna sandwiches. And, of course, it was great alone.

Timing details:
  • Midnight or so Friday: refreshed the starter
  • 9 am Saturday: mixed the dough and toasted walnuts
  • 9:40: mixed in the walnut pieces
  • 10:15, 10:30, 10:50: mini-kneads
  • 1:45: started shaping
  • 2:05: put it into the ghee-brushed baker
  • 4:35: put it into the oven; turned the oven on to 450
  • 5:05: took the top of the pan off
  • 5:15: took the loaf out of the oven
Temperature details:
  • The water I added to the starter was 88 degrees, by probe or by laser (pronounced LAY-zerrrrr). (The recipe called for 80 degrees.)
  • The kitchen was 73 degrees when I started, 75 by the time the dough started resting at 9:10, and 79 by 2.

Peanut butter ice cream

Peanut butter ice cream is easy and quick to make, following the recipe in The Perfect Scoop. I had a request to make peanut butter chocolate, so I mixed chocolate chunks into most of the batch. I love PBJ ice cream, so I made a bit of that, too. Sadly, I had no Bonne Maman, so I settled for another brand of raspberry preserves. Both the PBC and the PBJ were very good, especially the first day before the ice cream hardened.

Sorry, no pictures.